[vc_row css=”.vc_custom_1567441651052{margin-top: 30px !important;}”]
2. Set the type from “Automatic” to “Hybrid” and press “Save”.
3. Press the “Add” button to create a new mapping rule.[vc_single_image image=”19726″ img_size=”full” onclick=”link_image”]5. Modify the rule to define:
1. Under “System” > “Advanced” > “Firewall & NAT”
2. Set “Firewall Optimization Options” on “Conservative”.[vc_single_image image=”19728″ img_size=”full” onclick=”link_image”]
Objective of the guide:
[vc_separator css=”.vc_custom_1567441743182{margin-top: -20px !important;}”]To use the remote extensions of the VoIP provider, allow WebMeeting, use the smartphone APP, it is necessary to make changes to the firewall configuration, so that 3CX communicates correctly with the SIP trunks and remote IP phones. This guide provides the necessary information on how the ports to be opened / forwarded on the firewall as well as the necessary configurations on pfSense® for correct operation of the 3CX PBX.JTVCYWRyb3RhdGUlMjBiYW5uZXIlM0QlMjIzJTIyJTVEUsed Hardware:
[vc_separator css=”.vc_custom_1567441743182{margin-top: -20px !important;}”]This guide can be applied to all hardware certified by us of the 3CX line that you can find here: https://www.miniserver.it/appliance/3cx-applianceSoftware environment:
[vc_separator css=”.vc_custom_1567441743182{margin-top: -20px !important;}”]3cx Standard ed. free version that allows 8 simultaneous calls to be made both in and out and allows access to the WebMeeting of n. 25 concurrent users.- 3cx Standard ver.16.0.XXX
- pfSense® 2.4.x
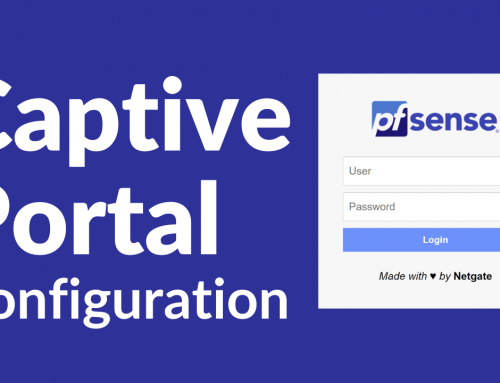
Step 1: Configure Port Forwarding (NAT):
[vc_separator css=”.vc_custom_1567441743182{margin-top: -20px !important;}”]Log in to the pfSense web management console and:- Pass to “Firewall” > “NAT”.
- Press “Add” right to add a new rule.
- Protocol: Set the protocol type based on the ports being forwarded
- Destination port range: select the port / port range for NAT. If the port is not predefined as shown for SIP, enter the ports manually.
- Destination IP address redirection: enter the internal IP address of the 3CX telephone system in our case “192.168.2.50”
- Redirect destination port: enter the internal port (which is generally the same as the external port)
- Description Label the rule to facilitate identification at a later stage
- NAT reflection: add associated filter rule
- Save / apply the configuration and repeat this procedure for each NAT required.
4. Repeat step # 3 for each port that needs to be forwarded.:[vc_single_image image=”19722″ img_size=”full” onclick=”link_image”]
Ports used:
[vc_separator css=”.vc_custom_1567441743182{margin-top: -20px !important;}”]ports for SIP trunk / VoIP provider:- Port 5060 (incoming, UDP) for SIP communications.
- Port 9000-10999 (incoming, UDP) for RTP (Audio) communications, ie actual call. Each call requires 2 RTP ports, one to control the call and one for the call data, so the number of ports that need to be opened is double the number of simultaneous calls.
Configure ports for remote 3CX apps:
- Port 5090 (incoming, UDP and TCP) for the 3CX tunnel.
- Port 443 or 5001 (incoming, TCP) HTTPS for presence and provisioning of the specified custom HTTPS port.
- Port 443 (outgoing, TCP) for Google Android Push.
- Port 2195, 2196 (outgoing, TCP) for Apple iOS Push.
Port configuration for remote IP phones / bridges via direct SIP:
- Port 5060 (incoming, UDP and TCP), Port 5061 (incoming, TCP if using secure SIP) – already open if using SIP trunks.
- Port 9000-10999 (incoming, UDP) for RTP – already open if SIP trunks are used.
- HTTPS port 443 or 5001 (incoming, TCP) for provisioning, unless custom PBX ports have been specified.
Port configuration for 3CX WebMeeting, SMTP and activation:
- Port 443 (outgoing, TCP) to webmeeting.3cx.net – allows traffic to the fully qualified domain name instead of to the IP address whenever possible, as the IP can change.
- Forward port 443 or 5001 (inbound, TCP) or the specified custom HTTPS port, to notify users of incoming web meetings.
- To send e-mail messages using 3CX SMTP, the network must allow outgoing TCP: 2528 for the 3CX host computer.
Step 2: Port Preservation
[vc_separator css=”.vc_custom_1567441743182{margin-top: -20px !important;}”][vc_single_image image=”19724″ img_size=”full” onclick=”link_image”]1. Go to “Firewall” > “NAT” > “Outbound”.2. Set the type from “Automatic” to “Hybrid” and press “Save”.
3. Press the “Add” button to create a new mapping rule.[vc_single_image image=”19726″ img_size=”full” onclick=”link_image”]5. Modify the rule to define:
- LAN IP of the 3CX host, for example 192.168.2.50.
- In the “Translation” section under “Port of Range” select “Static Port”.
6. Move the rule to the first position in the “Mapping” to ensure the operation, as illustrated in the first screen of this section.
Step 3: Optional settings
[vc_separator css=”.vc_custom_1567441743182{margin-top: -20px !important;}”]If the remote phones or VoIP provider work primarily but log off randomly, the following change may be appropriate.1. Under “System” > “Advanced” > “Firewall & NAT”
2. Set “Firewall Optimization Options” on “Conservative”.[vc_single_image image=”19728″ img_size=”full” onclick=”link_image”]
Step 4: Validate the configuration
[vc_separator css=”.vc_custom_1567441743182{margin-top: -20px !important;}”]Log in to the 3CX management console and go to “Dashboard” > “Firewall” to run 3CX Firewall Checker to check if the firewall is properly configured for use with 3CX.At this point the test should test all the ports one by one and return the relative feedback.